Checking for Entities
If you’re following up on this from my first post, you’ve already added your AppDaemon script and confirmed that the AppDaemon logs don’t show any errors. Now is the true test if it’s working: do you have the new sensors in HomeAssistant?!
The best way to do this is by just type e from any screen in the HomeAssistant UI! That will bring up a list of entities.
Start typing “bird” or “birdnet” and you should see the new entities listed there.
Dashboard Overview & Dependencies
Now that we have the correct entities, lets take a look at what we’re working with. Full disclosure that once I got this working, I haven’t really revisited it, refactored it, or made any improvements. I’m sure you’ll find ways to use less YAML, but I wanted to get this out there sooner than later!
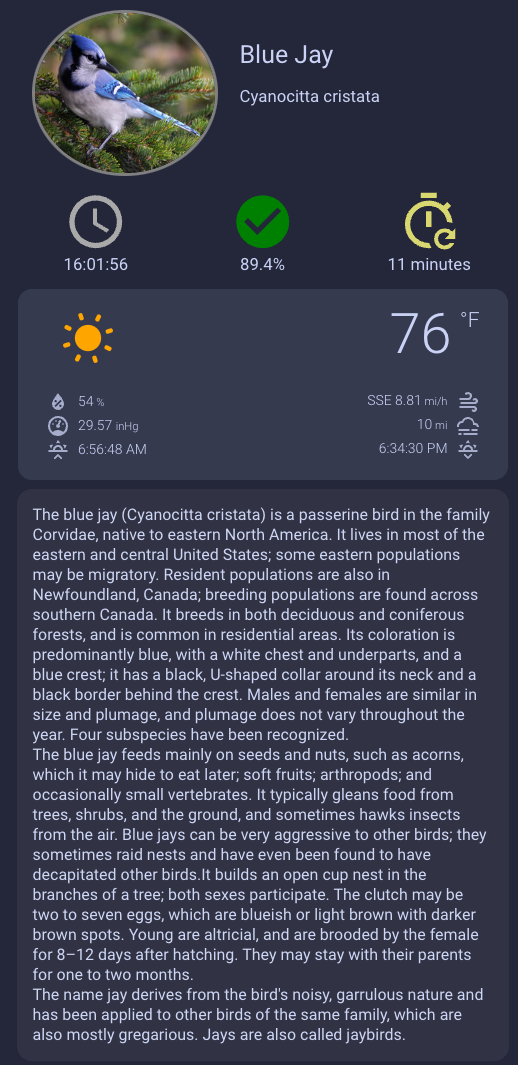
I’ve included the code for all the cards at the bottom of this post. You can find them here. This dashboard is pretty simple, it brings in almost all of the sensors we created in the first post and organizes them in an as-pleasant-as-possible view. I’m definitely not a designer, so some of the colors could be worked on…
Sensors in the dashboard:
- Overview Card:
- sensor.bird_common_name (only used to generate the picture)
- camera.birdnet_flickr
- sensor.bird_common_name
- sensor.bird_science_name
- Data Card:
- sensor.bird_time_seen
- sensor.bird_confidence
- sensor.bird_last_seen
- Weather Card:
- weather.pirateweather
- Description Card:
- sensor.birdnet_wiki
There are also two HomeAssistant dashboard dependencies that you’ll need for this dashboard:
Now that we’ve got that squared away, let’s jump into each card.
Overview Card
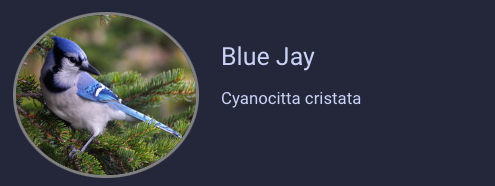
You’ll notice from the few dependencies listed above, that I use this button card. A lot.
RomRider did a fantastic job of adding in a ton of flexibility into the card. For the overview
card, we’re taking one of the entities, in this case, bird_common_name and attaching the Flickr picture/sensor to it. Then,
on the right, I’m displaying the name and common name. Here’s the overview card’s yaml.
The tricky or tedious part of this card is making sure most of the card’s attributes (icon, name, state, label) are set to false. Another option for the Common and Scientific name on the right is to use a markdown card. I couldn’t get the formatting just right when using that card and some grid-card tricks, so I opted to reuse the super flexible button-card.
Pay attention to the styles for the image (lines 24-40). Those are what keep the border around the image along with the image a certain height and width so that it looks proportional on the page.
One additional thing I have been toying with but hadn’t finalized was messing with [img_cell][border]. By adding some
javascript in that section (see other cards), you could change the color of the border based on another parameter. Perhaps
you look at the state of sensor.bird_common_name and if there is the name of a color in there, that’s the border’s color.
Feel free to get crazy and creative with this!
Overview Card YAML
type: horizontal-stack
cards:
  - type: custom:button-card
    entity: sensor.bird_common_name
    triggers_update: all
    show_name: false
    show_icon: false
    show_state: false
    show_label: false
    styles:
      card:
        - background: transparent
        - border: none
        - width: 215px
        - height: 175px
    custom_fields:
      picture:
        card:
          type: custom:button-card
          entity: camera.birdnet_flickr
          show_entity_picture: true
          show_name: false
          show_icon: false
          styles:
            card:
              - height: 100%
              - width: 100%
              - padding: 0px 15px 0px 15px
              - border-radius: 3px 3px 15px 3px
              - border: none
              - background: transparent
              - overflow: visible
            img_cell:
              - width: 180px
              - height: 160px
              - border-radius: 69%
              - border: 3px solid grey
            entity_picture:
              - width: 215px
              - height: 100%
  - type: vertical-stack
    cards:
      - type: custom:button-card
        entity: sensor.bird_common_name
        show_entity_picture: true
        show_state: true
        show_name: false
        show_icon: false
        styles:
          card:
            - background: transparent
            - border: none
            - margin-top: 35px
            - font-size: 25px
            - width: auto
      - type: custom:button-card
        entity: sensor.bird_science_name
        show_entity_picture: true
        show_state: true
        show_name: false
        show_icon: false
        styles:
          card:
            - background: transparent
            - border: black
            - width: auto
Data Card
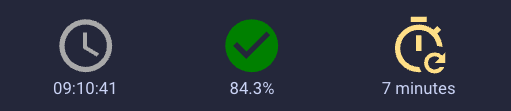
This card is fairly straight forward in that it’s showing 3 key data points: the time of detection, detection confidence, how long ago it was seen. This could be fairly redundant since we already have the time of detection, but when you’re just quickly glancing at the dashboard, minutes ago is much faster brain processing than comparing the timestamp and the current time.
You’ve likely picked up by now that in the previous post, we never sent a payload to create the sensor.bird_last_seen
entity. Here’s how you can do it.
Creating Bird Last Seen Entity
When I first set out to create this sensor, I was messing with jinja templates for timestamp, datetime, strptime, and more. Here are a few code blocks I saved in my notes in case I went too far down the wrong path. Here are a few of them.
{{ now() - state_attr(sensor.bird_time_seen, 'last_triggered') > timedelta(hours=24) }}
or:
{% set bird = strptime(states('sensor.bird_time_seen'), "%H:%M:%S") %}
{{ relative_time(bird) }}
The thing is, HomeAssistant has already implemented this really neat feature for calculating time, especially from when
something was last updated. This function is called relative_time. Having something like this allows you set automations
to run after a specific amount of time has passed since the last time a sensor or entity was updated.
An idea! 💡 For our specific use case, you could set up an automation that sends you a notification if no birds have been detected for over 30 minutes. Of course, we’ll set parameters like not to notify you at night or during the winter months.
The issue I faced with relative time has to do with the sensors I created from my AppDaemon script. Relative time expects
a date and time. I was only passing the time. In Home Assitant if you use the Developer Tools > Template to test relative
time out on the sensor.bird_time_seen sensor, you’ll get a result of 126 years… That’s because without a date, Home
Assistant defaults the date to 1900-01-01. The full relative_time return is 1900-01-01 15:15:15.
We could go back and set the sensors to include both date and time, but I prefer them separate so that I can use them in
different places. For this dashboard, the day is always today, so having the date felt redundant. To create a new sensor
using the relative_time function, you’ll need to edit your configuration.yaml.
Once you’re editing your config file, add the following:
template:
# Bird Time Last Seen
  - sensor:
      - name: "Bird Last Seen"
        state: >
          {% set birdseen = (states('sensor.bird_date_seen')+' '+states('sensor.bird_time_seen')) %}
          {% set bird = relative_time(strptime(birdseen, '%Y-%m-%d %H:%M:%S')) %}
          {{ bird }}
What this does is uses Home Assistant’s templating functionality and creates a new sensor called “Bird Last Seen”. The
default sensor. name will be sensor.bird_last_seen.
To configure the state of that sensor, we first set a variable called birdseen. To this variable we are assigning the
concatenated values of bird_date_seen, a single whitespace, and bird_time_seen. We’re choosing this format because that
is the format that relative_time returned before when we tried using it without a date.
As a quick experiment, take the templating code under the state: > parameter above and throw it into Developer Tools >
Template. Do you get 126 years? Or something more realistic? If something more realistic, amazing!
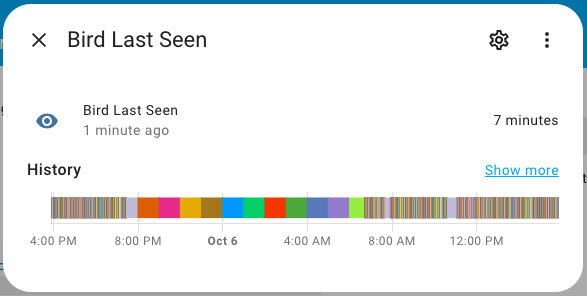
We’re almost there! Here’s what you should see in HomeAssistant if the sensor was created correctly.
If you’re new to templating for Home Assistant (or in general!) it would be helpful to read through a few of the docs that HomeAssistant provides.
Note: Jinja2 is very popular and common. Learning it for home automation is worth it alone, but it may very well come in handy in other places too!
Data Card Yaml
type: horizontal-stack
cards:
  - type: custom:button-card
    entity: sensor.bird_time_seen
    show_state: true
    show_icon: true
    show_name: false
    icon: mdi:clock-outline
    color: darkgrey
    styles:
      card:
        - border: none
        - background: transparent
  - type: custom:button-card
    entity: sensor.bird_confidence
    show_state: true
    show_icon: true
    show_name: false
    icon: mdi:check-circle
    styles:
      card:
        - border: none
        - background: transparent
      icon:
        - color: |
            [[[
              if (states['sensor.bird_confidence'].state > 80 )
                return "green";
              return "lightblue";
            ]]]
  - type: custom:button-card
    entity: sensor.bird_last_seen
    show_state: true
    show_icon: true
    show_name: false
    icon: mdi:timer-refresh-outline
    styles:
      card:
        - border: none
        - background: transparent
      icon:
        - color: |
            [[[
               var y = states['sensor.bird_last_seen'].state;
               let x = y.slice(0, 2);
               var e = Number(x);
               if (e < 5) return '#ff6969';
               if (e < 10) return '#ffdf87';
               if (e < 15) return '#d9d76f';
               if (e < 20) return '#fcc2ea';
               else return '#ccccc8';
            ]]]
Weather Card
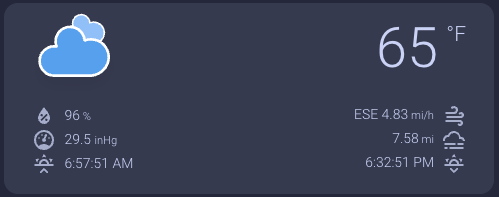
This doesn’t need a lot of explaining or instructions. It is just the standard weather card! Here’s the YAML, none of the less, so you know what I toggled on/off. I’m using Pirate Weather Integration as my data source.
Weather Card
type: custom:weather-card
entity: weather.pirateweather
forecast: false
hourly_forecast: false
name: null
details: true
current: true
number_of_forecasts: '5'
Description Card
Finally, we reach the bottom of the dashboard: the description card. This one is also really straightforward. We’re just using a standard markdown card and taking the description sensor we created using Wikipedia’s API and making that the main content of the card.
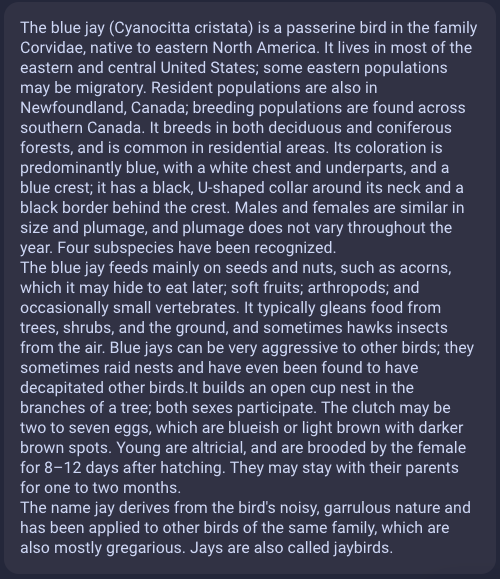
Other than setting the theme, the only other small changes are removing the border and increasing from the default font size. We’ll use Thomas Loven’s famous Card Mod for that.
Description Card
type: markdown
content: '{{ state_attr(''sensor.birdnet_wiki'',''description'')}}'
theme: Catppuccin Mocha
card_mod:
  style: |
    ha-card.type-markdown {
      border: none;
    }
    ha-markdown {
      font-size: 16px;
    }
Conclusion
And that’s all there is to it! I say that flippantly, but I know that it can seem like there’s a lot of setup. Everything I did here evolved out of other people’s projects and dashboards on Reddit or the invaluable HomeAssistant Community
Please feel free to reach out to me on Mastodon if you have any questions or get stuck anywhere!
Full Dashboard YAML
Full Dashboard YAML
- theme: Catppuccin Macchiato
    title: BirdNet-Dashboard
    path: birdnet-dashboard
    icon: mdi:bird
    type: custom:vertical-layout
    badges: []
    cards:
      - type: horizontal-stack
        cards:
          - type: custom:button-card
            entity: sensor.bird_common_name
            triggers_update: all
            show_name: false
            show_icon: false
            show_state: false
            show_label: false
            styles:
              card:
                - background: transparent
                - border: none
                - width: 215px
                - height: 175px
            custom_fields:
              picture:
                card:
                  type: custom:button-card
                  entity: camera.birdnet_flickr
                  show_entity_picture: true
                  show_name: false
                  show_icon: false
                  styles:
                    card:
                      - height: 100%
                      - width: 100%
                      - padding: 0px 15px 0px 15px
                      - border-radius: 3px 3px 15px 3px
                      - border: none
                      - background: transparent
                      - overflow: visible
                    img_cell:
                      - width: 180px
                      - height: 160px
                      - border-radius: 69%
                      - border: 3px solid grey
                    entity_picture:
                      - width: 215px
                      - height: 100%
          - type: vertical-stack
            cards:
              - type: custom:button-card
                entity: sensor.bird_common_name
                show_entity_picture: true
                show_state: true
                show_name: false
                show_icon: false
                styles:
                  card:
                    - background: transparent
                    - border: none
                    - margin-top: 35px
                    - font-size: 25px
                    - width: auto
              - type: custom:button-card
                entity: sensor.bird_science_name
                show_entity_picture: true
                show_state: true
                show_name: false
                show_icon: false
                styles:
                  card:
                    - background: transparent
                    - border: black
                    - width: auto
      - type: horizontal-stack
        cards:
          - type: custom:button-card
            entity: sensor.bird_time_seen
            show_state: true
            show_icon: true
            show_name: false
            icon: mdi:clock-outline
            color: darkgrey
            styles:
              card:
                - border: none
                - background: transparent
          - type: custom:button-card
            entity: sensor.bird_confidence
            show_state: true
            show_icon: true
            show_name: false
            icon: mdi:check-circle
            styles:
              card:
                - border: none
                - background: transparent
              icon:
                - color: |
                    [[[
                      if (states['sensor.bird_confidence'].state > 80 )
                        return "green";
                      return "lightblue";
                    ]]]
          - type: custom:button-card
            entity: sensor.bird_last_seen
            show_state: true
            show_icon: true
            show_name: false
            icon: mdi:timer-refresh-outline
            styles:
              card:
                - border: none
                - background: transparent
              icon:
                - color: |
                    [[[
                       var y = states['sensor.bird_last_seen'].state;
                       let x = y.slice(0, 2);
                       var e = Number(x);
                       if (e < 5) return '#ff6969';
                       if (e < 10) return '#ffdf87';
                       if (e < 15) return '#d9d76f';
                       if (e < 20) return '#fcc2ea';
                       else return '#ccccc8';
                    ]]]
      - type: custom:weather-card
        entity: weather.pirateweather
        forecast: false
        hourly_forecast: false
        name: null
        details: true
        current: true
      - type: markdown
        content: '{{ state_attr(''sensor.birdnet_wiki'',''description'')}}'
        theme: Catppuccin Mocha
        card_mod:
          style: |
            ha-card.type-markdown {
              border: none;
            }
            ha-markdown {
              font-size: 16px;
            }