This is Part One of a Two Part Series. You can find Part Two, here.
Update: 10/11/2023. A huge thanks to Mastodon User e_mobile2014 who found a broken link in this guide and pointed out that I never explained how to get the mqtt sensors into HomeAssistant!
What you will need
- BirdNET-Pi
- HomeAssistant
- AppDaemon
- MQTT Broker (I use Mosquitto)
Background
In early 2023, at the height of the Raspberry Pi shortage I felt like a king with an extra Rpi laying around, not being used. I’m a big fan of any sort of passive intake of information and had been looking around for various citizen science-style projects that can capture information from the world around me. Since I’m already running an ADS-B antenna with Flight Aware, I figured this next project would deal with radio waves/transmissions. Instead, to my amazement, I discovered BirdNET-Pi!
What is BirdNET-Pi?
In case you didn’t click the links above, BirdNET-Pi is an app built specifically made for Rapsberry Pi devices, that builds off the BirdNET Framework. BirdNET is one of the most advanced acoustic monitoring tools available for passively monitoring bird diversity populations. Where BirdNET-Pi takes it to the next level is the ability to setup an SBC - hopefully enclosed in a waterproof space! - and monitor birds in your local environment over time.
I think this project is beyond neat. It runs a bit slow on a Raspberry Pi 3, but overall it runs smoothly. I was even able to contribute a PR to the project in April when I noticed a bug in the platform after a hard reset of my Pi.
BirdNET-PI Notification Setup - MQTT
Once you have BirdNET-Pi up and running, you’ll need to head over to the Settings and setup the correct MQTT payloads. Here are the possible variables you can pass in an MQTT payload:
$sciname: Scientific Name$comname: Common Name$confidence: Confidence Score$confidencepct: Confidence Score as a percentage (eg. 0.91 => 91)$listenurl: A link to the detection$date: Date$time: Time$week: Week$latitude: Latitude$longitude: Longitude$cutoff: Minimum Confidence set in “Advanced Settings”$sens: Sigmoid Sensitivity set in “Advanced Settings”$overlap: Overlap set in “Advanced Settings”$flickrimage: A preview image of the detected species from Flickr. Set your API key below.
For our purposes, we will only be using $comname, $sciname, $date, $time, $week, and $confidence. However, this entire
process is extremely customizable, which you’ll learn more about in the AppDaemon section. Please expand on it and include
information that is pertinent to your own uses.
Here is how I’ve setup my MQTT payload from BirdNET-Pi Settings:
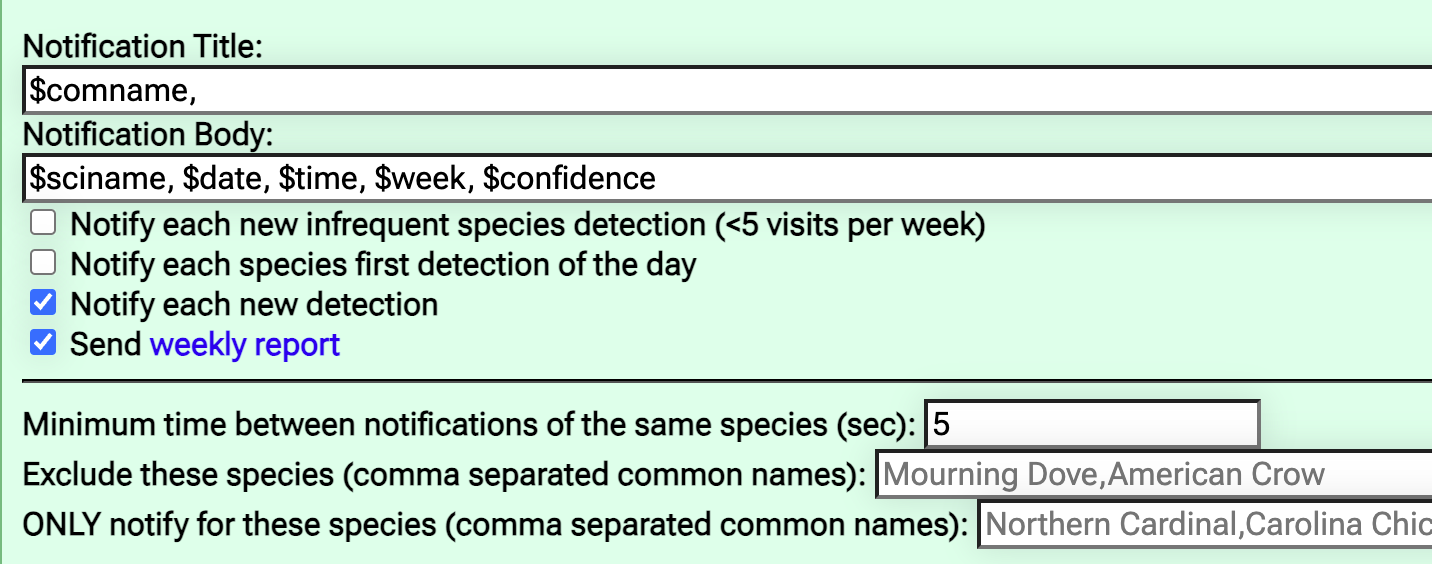
Here it is in text form:
Notification Title: $comname,
Notification Body: $sciname, $date, $time, $week, $confidence
[ ] Notify each new infrequent species detection (< 5 visits per week)
[ ] Notify each new species first detection of the day
[X] Notify each new detection
[X] Send weekly report
Minimum time between notifications of the same species (sec): 5
To test my MQTT notifications, I use the iOS client “MQTTool”. After signing up, head to “Subscribe” and type birdnet as
the topic and then click Subscribe. If everything is setup correctly and there are birds being recorded by the BirdNET-Pi’s
microphone, you should start seeing those detections in the MQTTool app. If so, fantastic news! Let’s move onto AppDaemon.
AppDaemon Script
Now that we have the Pi communicating via MQTT, it’s time to get that information into HomeAssistant. I’ve shared the full script at the bottom of this page, but let’s jump into each section. This is not a full tutorial of how to use AppDaemon, but it may help fill in any knowledge gaps with the system.
Imports
First, we’re going to import time and requests. We’re going to use time as a backup to the $time component in the
payload. This can be helpful to see if there delays, or if BirdNET-Pi stopped detecting. We’re then going to use requests to
pull from Wikipedia’s API and grab a description for our HomeAssistant Dashboard.
Class Definition
To start any AppDaemon app, you need to include a Class that is defined in the apps.yaml file. This is also where we
initialize and define the various items that will be used in the remainder of the script.
class birdnet(adbase.ADBase):
    def initialize(self):
        self.hassapi = self.get_plugin_api("HASS")
        self.adapi = self.get_ad_api()
        self.mqttapi = self.get_plugin_api("MQTT")
        self.birdnet_mqtt = "birdnet"
        self.mqttapi.listen_event(
            self.birdnet_message, "MQTT_MESSAGE", topic=self.birdnet_mqtt
        )
For this script, we need to use a lot of the AppDaemon APIs across more than just HomeAssistant, so we’re going to be using
ADBase. By using that, we can initialize the various APIs, which we do in the next 3 lines. In these 3 lines we need to get
access to HomeAssistant’s APIs, AppDaemon’s APIs, and MQTT APIs - the first and third items are plugins of AppDaemon, and
AppDaemon is… well… AppDaemon! Here are a few reference docs:
These will indispensable to you as you leverage AppDaemon and expand this little script.
Once we have access to that, we need to setup the main topic for MQTT from BirdNET-Pi and finally, what event we are
listening for that will trigger the functions in the rest of the script. self.birdnet_mqtt = "birdnet" is the definition
for the MQTT topic. Let’s breakdown the last line of the class.
Here’s a breakdown of each of the items in that last line. You can find the official documentation here.
self.mqttapi.listen_event- this is what we use in AppDaemon to listen for an MQTT event in order to trigger a function.self.birdnet_message- the name of the function you’d like to trigger"MQTT_MESSAGE"- The default event in AppDaemon’s MQTT API plugin. This is used because MQTT doesn’t keep a state in this plugin.topic=self.birdnet_mqtt- The topic that will be received to trigger the function. Defined on the previous line.
In other words, what we are telling AppDaemon is the following: “When AppDaemon’s MQTT API plugin receives a message with the
topic of ‘birdnet’, run the function birdnet_message.”
birdnet_message Function
Part 1: Variables Management
Now we get into our first function of the script. The first portion of this script is splitting up the payload that we
defined from the BirdNET-Pi UI into individual variables that we can better manage later on. If you test this script out by
adding print() statements at various points, you’ll notice that the payload is received with the following json formatting:
{
 "payload": {
  "data": "data"
 }
}
As such, we need to look inside the payload to begin grabbing the data. The pre_split variable is now just looking at the
data inside the payload and the rest of the variables take all the date into the payload, split it by the comma, and then
grab the string by their index. If you remember what we did above above, you’ll see that we have the various BirdNET information at each of the indexes in the AppDaemon script - 0 through 5.
Part 2: Re-Publishing MQTT Payloads
This next section is shooting all the variables we just defined back via MQTT. The reason why we do it this way is because we
need HomeAssistant to grab each of these variables as individual sensors. BirdNET doesn’t give us that capability - it’s a
single message with all the information in one. Here is the documentation from AppDaemon on mqtt_publish. Later on, I’ll show you how to ensure that HomeAssistant takes those topic payloads and adds them as
entities in your HA setup.
Part 3: Wikipedia Sensor
The next eight lines are a fairly straightforward API call to Wikipedia. We start
out by passing the science_name into the URL. The rest of the flags that we are passing into the URL comes from Wikipedia’s
Docs.
url = f"https://en.wikipedia.org/w/api.php?format=json&action=query&prop=extracts&exintro&explaintext&redirects=1&titles={science_name}"
Once that’s done we call it with response.get(url) and format it with response.json(). Wikipedia returns the json payload
with the top level of query (which was our action in the url ;) ), and we’re looking for the value within that query.
All that’s left is to take that query value and push it to HomeAssistant! We can do that with the self.hassapi.set_state
function. Within the parenthesis we define the name of the sensor (sensor.birdnet_wiki), what it’s state should be (on),
and any attributes associated with the entity. Since we can’t assign a long description to the basic status of the entity,
we’re adding an attribute with the key of description and the value will be the wikipedia description garnered from the API
call.
        url = f"https://en.wikipedia.org/w/api.php?format=json&action=query&prop=extracts&exintro&explaintext&redirects=1&titles={science_name}"
        response = requests.get(url)
        response = response.json()

        for value in response['query']['pages']:
            wiki_desc = response['query']['pages'][value]['extract']
            self.hassapi.set_state("sensor.birdnet_wiki", state='on',
                                   attributes = {"description": wiki_desc})
Part 4: Generate Picture for Detection (Optional)
This part is optional but I noticed that BirdNET-Pi was already grabbing a Flickr Picture for it’s front end, so I took the code from the BirdNET code base and adjusted it a bit for my needs. This will work very similarly to the Wikipedia API call, the main difference here being that you need an API key for Flickr. You can find more information here.
Given Flickr’s fairly robust API, by passing in the detected bird’s common name, we get amazing results from the community of various pictures of the same species of bird. Ever since I’ve set this up, I’ve not seen a mislabeled picture in my dashboard!
The most confusion portion of this section is the image_url as you’ll notice a bunch of data["value"] strings at various
portions of the URL. The short answer to this is in the previous line with the data variable. A successful query has Flickr
returning a large payload of information. We’re specifically using this
Flickr API endpoint. While you can pass a lot of variables for your needs, if you scroll down, you can see that the example
response contains multiple photos in a single response. We’re passing per_page=5 to limit some of those response items.
Left out of that response, though, is a one-stop-shop for a URL to that photo. Thankfully, Flickr can help us put together a
URL from the data in the response.
Note: Full Transparency that I only learned about this after reading through BirdNET-Pi’s code base. Full credit goes to mcguirepr89. For additional reference, here is Flickr’s official page on construction photo image URLS
With this response, we now have the variables we need to construct the URL to actually render the image. Those variables are: Farm ID, Server ID, ID and Secret. I haven’t yet looked into why we need “farm” when the official documentation doesn’t state anything about it.
Almost there! We now do the same as we did with the Wikipedia API response. We create a sensor in HomeAssistant! We’re
calling this sensor sensor.birdpic, ensuring the state=on, and giving it the attributes of the image_url as garnered
from Flickr.
        headers = {'User-Agent': 'Python_Flickr/1.0'}
        flickr_api = "enter_your_api_key"
        flickr_url = f"https://www.flickr.com/services/rest/?method=flickr.photos.search&api_key={flickr_api}&text={common_name} bird&sort=relevance&per_page=5&media=photos&format=json&nojsoncallback=1"
        flickr_resp = requests.get(url=flickr_url, headers=headers)
        data = flickr_resp.json()["photos"]["photo"][0]

        image_url = 'https://farm'+str(data["farm"])+'.static.flickr.com/'+str(data["server"])+'/'+str(data["id"])+'_'+str(data["secret"])+'_n.jpg'

        self.hassapi.set_state("sensor.birdpic", state='on',
                               attributes={"image": image_url})
Importing MQTT Sensors into HomeAssistant
Now that we have all the sensors defined and communicating via MQTT, we have one more step to import them into HomeAssistant. This MQTT documentation by HomeAssistant is good to read about if you need a broker setup. I will not be going over the broker in this tutorial, but may add one in the future. I tend to like the yaml configuration for HomeAssistant, so for the sake of this guide, I’ll be referencing the manual configuration of MQTT items and sensors.
To add the sensors from above, open up your configuration.yaml file in your favorite editor. You’ll then want to add the
mqtt platform and domain:
mqtt:
  - { domain }:
For the BirdNet sensors, we will be using a single domain: sensor. Feel free to copy and paste my config from below, but
make sure the names of each entity align with your needs, syntax, and nomenclature/system.
Full MQTT Sensors in Configuration.yml
mqtt:
  sensor:
    - name: "Bird Common Name"
      state_topic: "birdnet/sensors/common_name"
    - name: "Bird Science Name"
      state_topic: "birdnet/sensors/science_name"
    - name: "Bird Time Seen"
      state_topic: "birdnet/sensors/time_seen"
    - name: "Bird Date Seen"
      state_topic: "birdnet/sensors/date_seen"
    - name: "Bird Confidence"
      state_topic: "birdnet/sensors/confidence"
      value_template: '{{ (value|float(0) *100) | round(1) }}'
      unit_of_measurement: '%'
You might be looking at the list above and wondering where the Flickr and Wikipedia Description entities are. They were
already created by the AppDaemon script! Specifically, self.hassapi.set_state() function will either update the state for
an exisiting entity or, if the entity doesn’t exist, it will create a new one.
For the rest of the mqtt payloads, we need HomeAssistant to create them as they come in, which is why we add the above code block to our HomeAssistant configuration file. To be clear, you do not need to add the Wikipedia and Flickr sensors to HA’s configuration file!
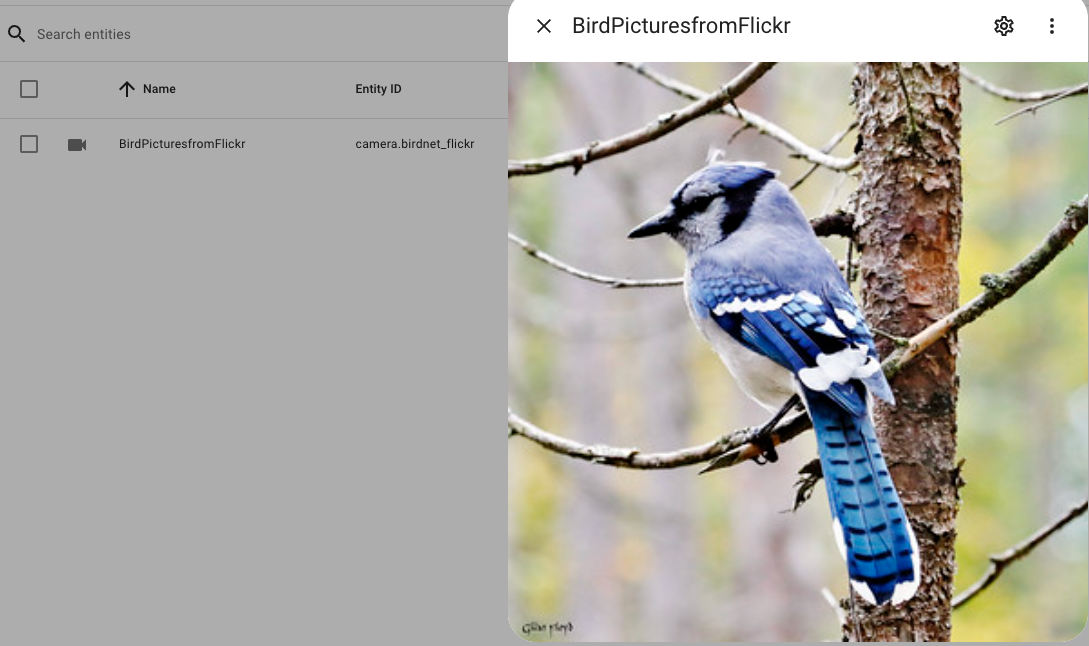
Adding the Camera entity
Last but not least, we need to add a camera entity to ensure that the sensor.birdpic can actually be rendered visually.
It’s really easy to add this sensor, so this should be quick. Here’s how:
- In HomeAssistant, navigate to Settings > Devices & Services > Integrations
- Click “+ Add Integration” in the bottom right-hand corner. Alternatively, if you already have a camera integration enabled, look for the “Generic Camera” card and click “Add Entry”
- Name the sensor. In this case, I called it “BirdPicturesfromFlickr” and renamed the entity to
camera.birdnet_flickr. - You should now see a “Still Image URL” as the first of a few options on the screen. Enter the following into the still
image field:
{{ state_attr('sensor.birdpic', 'image') }}(This is the sensor we created in AppDaemon with the flickr url as the attribute). - Stream Source and RTSP transport protocol can both be left blank.
- Authentication - select “digest”.
- Username and Password can be left blank.
- Frame Rate - 2
- Leave the rest of the check boxes unchecked and click Submit
When you now click on the entity, you should see an image!
By this point, you should have successfully created 7 new sensors in HomeAssistant. In Part 2 of this article, we’ll take a look at Home Assistant, see what these sensors look like, and create a rudimentary dashboard.
Birdnet AppDaemon Script
import time
import requests


class birdnet(adbase.ADBase):
    def initialize(self):
        self.hassapi = self.get_plugin_api("HASS")
        self.adapi = self.get_ad_api()
        self.mqttapi = self.get_plugin_api("MQTT")
        self.birdnet_mqtt = "birdnet"
        self.mqttapi.listen_event(
            self.birdnet_message, "MQTT_MESSAGE", topic=self.birdnet_mqtt
        )

    def birdnet_message(self, event_name, data, kwargs):
        pre_split = data["payload"]
        common_name = pre_split.split(',')[0].strip()
        science_name = pre_split.split(',')[1].strip()
        date_seen = pre_split.split(',')[2].strip()
        time_seen = pre_split.split(',')[3].strip()
        week_seen = pre_split.split(',')[4].strip()
        confidence = pre_split.split(',')[5].strip()

        # print(f"A {common_name} was seen on {date_seen} at {time_seen}. Confidence is {confidence}.")

        self.mqttapi.mqtt_publish("birdnet/sensors/common_name", common_name)
        self.mqttapi.mqtt_publish("birdnet/sensors/science_name", science_name)
        self.mqttapi.mqtt_publish("birdnet/sensors/time_seen", time_seen)
        self.mqttapi.mqtt_publish("birdnet/sensors/date_seen", date_seen)
        self.mqttapi.mqtt_publish("birdnet/sensors/confidence", confidence)

        url = f"https://en.wikipedia.org/w/api.php?format=json&action=query&prop=extracts&exintro&explaintext&redirects=1&titles={science_name}"
        response = requests.get(url)
        response = response.json()

        for value in response['query']['pages']:
            wiki_desc = response['query']['pages'][value]['extract']
            self.hassapi.set_state("sensor.birdnet_wiki", state='on',
                                   attributes = {"description": wiki_desc})

        headers = {'User-Agent': 'Python_Flickr/1.0'}
        flickr_api = "enter_your_api_key"
        flickr_url = f"https://www.flickr.com/services/rest/?method=flickr.photos.search&api_key={flickr_api}&text={common_name} bird&sort=relevance&per_page=5&media=photos&format=json&nojsoncallback=1"
        flickr_resp = requests.get(url=flickr_url, headers=headers)
        data = flickr_resp.json()["photos"]["photo"][0]

        image_url = 'https://farm'+str(data["farm"])+'.static.flickr.com/'+str(data["server"])+'/'+str(data["id"])+'_'+str(data["secret"])+'_n.jpg'

        self.hassapi.set_state("sensor.birdpic", state='on',
                               attributes={"image": image_url})